Posts mit dem Label opengl werden angezeigt. Alle Posts anzeigen

Samstag, 18. Mai 2013

Planet Gravitation Map Simulator

Screenshot CUDA / OpenGL Demo of Gravitation Map Simulator
This is just another fun demo for CUDA and OpenGL. It is a slightly modified version of the so called "random oscillating magnetic pendulum" (ROMP). A pixel represents a start position of one particle. This object becomes attracted by all the planets around due to their gravity. After a while the object is going to hit a planet. Now that corresponding pixel gets the color of that planet. You see an evolving map of "gravity" structures in realtime (more or less *cough*).


Download: (tested on Linux and Windows (VS2010), needs CUDA, OpenGL, GLUT, GLEW)

Download Source Code v1.1
Download Source Code v1.0


Positions and masses of the planets can be changed by the user as well as the scale of the map.

The simulation uses Euler or Runge-Kutta integration method for solving the differential equation. It is also possible to use doubles instead of floats for better precision.

The idea for this demo comes from a friend, he also implemented the algorithm in processing. I ported this to CUDA, so the stuff is entirely computed and rendered on the GPU. You need a Nvidia CUDA capable GPU for that.
Screenshot 2.1, different coloring
Screenshot 2.2

Computation

Given a particle at position $ \vec{y}(t)=\left(x(t), y(t)\right)$ at a time t. This particle has a (positive) mass m. In our space there are n planets with their fixed positions $ \vec p_1,\ldots,\vec p_n$ and (positive) masses $ m_1,\ldots,m_n$.
The following equation represents the gravitational force of planet i acting on our particle. This force comes from Newton's law of universal gravitation:

$\displaystyle \vec F_i = G\frac{m_i\cdot m}{r_i^2}\vec e_{r_i}$
G is just a gravitation constant and can be neglected for our purposes. r is the distance between the particle and the planet, $ \vec e_r$ is the force direction vector:
$\displaystyle \vec e_r = \frac{\vec p_i - \vec y}{\Vert \vec p_i - \vec y\Vert}$
Hence, there is the following force at a time t:
$\displaystyle \sum_{i=1}^n\vec F_i(t) = \sum_{i=1}^n m\cdot \frac{m_i\cdot\left(\vec p_i - \vec y(t)\right)}{\Vert\vec p_i-\vec y(t)\Vert^3}$
Newton's second law gives the equality:

$\displaystyle \vec F=m\cdot\vec a\Rightarrow \sum_{i=1}^n\vec F_i(t) = m\cdot \frac{\mathrm d^2 \vec y(t)}{\mathrm dt^2}$
The mass m of the particle can be eliminated in the equation. This ordinary differential equation system of order 2 need to be integrated two times to obtain the position function:

\begin{displaymath}\begin{split}\vec v(t) =& \frac{\mathrm dy(t)}{\mathrm dt}=\i...
...c y(t) =& \int\limits_0^t \vec v(\tau)\mathrm d\tau \end{split}\end{displaymath}    

This integration can be solved numerically, e.g. by Euler's method:

\begin{displaymath}\begin{split}\vec v_{k+1} =& \vec v_k + h\cdot\sum_{i=1}^n\fr...
...y_k\Vert^3}\\ \vec y_{k+1} =& \vec y_k + h\cdot v_k \end{split}\end{displaymath}    

with $ y_k{=}y(t_k),\, v_k{=}(t_k),$ and $ y(t_0){=}y_0,\, v(t_0){=}v_0$ as the initial values. h is the size of every step and v represents the velocity of the particle.


Here you see some videos, which are showing the simulation more or less in realtime.


More:
Article by Ingo Berg, 2006, on magnetic pendulum with implementation (using Beeman's algorithm):
http://www.codeproject.com/Articles/16166/The-magnetic-pendulum-fractal

Mathematica implementation:
http://nylander.wordpress.com/2007/10/27/magnetic-pendulum-strange-attractor/

Some more stuff, videos:
http://magnetmfa.wikispaces.com/pendula?responseToken=05ae0f7708a5c4c989455051dc970f570
http://www.youtube.com/watch?v=duy8s8C7-Uc
http://www.youtube.com/watch?v=QXf95_EKS6E

Dienstag, 29. Mai 2012

Kleine Linksammlung ([GP]GPU, Hardware)

CUDA

CUDA Webinars (Online Präsentationen zu CUDA und GPGPU Techniken):
http://developer.nvidia.com/cuda/cuda-education-training

Zur GT300/GF100 bzw. Fermi Architektur
http://www.nvidia.com/object/GTX_400_architecture.html
http://www.computerbase.de/artikel/grafikkarten/2010/bericht-nvidia-gf100-technische-details/4/#abschnitt_streaming_multiprocessor_sm

Artikel zur GTX 470/480 und Fermi-Architektur
("Vergleich" mit ATi HD5870)
http://www.tweakpc.de/hardware/tests/grafikkarten/nvidia_geforce_gtx_480/s02.php

CUDA und OpenCL Vergleich und Missverständnisse
http://www.streamcomputing.eu/blog/2011-06-22/opencl-vs-cuda-misconceptions/

CUDA Supported GPUs:
http://en.wikipedia.org/wiki/CUDA#Supported_GPUs

GPGPU/CUDA Einführung, Workflow (ausführliche Informationen mit Tipps&Tricks)
http://www.moderngpu.com/intro/performance.html
http://www.moderngpu.com/intro/workflow.html

 
Nomenklatur Nvidia GeForce

Die Namensgebung von Nvidia ist äußerst "interessant". Anbei ein paar Auflistungen zur möglichen Entwirrung.
Hinweise: Die Bezeichnung der Chiparchitektur müssen nicht immer mit den Modellbezeichnungen 1-zu-1 übereinstimmen. Auch bedeutet eine höhere Modellnummer nicht automatisch bessere Technik. Neuauflagen (Rebranding) älterer Grafikchips sind zu berücksichtigen. So verwenden die GTS 240/250 noch den G92b Chip, während sonst die Geforce 200 Serie auf GT2xx Chip basiert. Modelle wie GT 320 verwenden noch den GT2xx Chip. Die GT 330 verwendet sogar noch den G92b Grafikchip.

Geforce 9 Modelle wurden später einfach umbenannt und finden sich als GT 1xx wieder. Die Umbenennung schließt die Lücke zwischen der 9er Serie und der nachfolgenden GT200 Architektur, wenn ich das richtig verstanden habe. Eine Geforce 9500 GT heißt dann Geforce GT 120. GT200 ist dann als Nachfolger die eigentliche Tesla Architektur und entsprechende Modelle heißen bspw. GT 240 oder GTX 285. Der Grafikchip GT300 führt die Fermi Architektur ein und begründet wieder eine neue Kodierung: GF100. Analog bei der Kepler Architektur mit GK100. Mit der GT100er/200er Serie kommt generell ein neues Bezeichnungsschema für die GPU-Modelle zum Einsatz:
  • G oder kein Suffix – Low-Budget
  • GT – Mainstream
  • GTS – Performance
  • GTX – High-End
CUDA Generation Codename Grafikchip Beispielmodelle
1 (Unified Shader Architecture) G80, G92[b], G94, G96[b], G98 Geforce 8800GT, Geforce 9800GT, ...
siehe auch Geforce 100 Serie
2 Tesla GT200[b], GT215, GT216, GT218 GT 240, GTX 285, ...
GT320, GT 340, ...;  
Tesla C1060
(Geforce 405)
3 Fermi GF100, GF104, GF106, GF108;
GF110, GF114,...
GT 440, GTX 470;
GT 520, GTX 570, GTX 580;
GT 605, GT 620, GT 645
4 Kepler GK104, GK107, GK108, GK114,... GT 630, GTX 670, GTX 680, GTX 690
5 (>=2013) Maxwell


- http://en.wikipedia.org/wiki/GeForce#Nomenclature
- http://forums.nvidia.com/index.php?showtopic=226700&st=40
- http://www.pcgameshardware.de/aid,775478/Nvidia-Nach-Fermi-folgen-Kepler-und-Maxwell/Grafikkarte/News/


OpenGL / DirectX

Warum DirectX inzwischen so verbreitet ist, obwohl OpenGL mindestens wenn nicht sogar bessere Chancen hatte:
API use was shifted in favor of DirectX by Microsoft's two-pronged DirectX campaign around the launch of XBox 360 and Windows Vista, including the spread of FUD (fear, uncertainty and doubt) about the future of OpenGL, and wild exaggeration of the merits of DirectX. Ever since then, the network effects have amplified this discrepency until OpenGL has almost disappeared entirely from mainstream PC gaming.
http://blog.wolfire.com/2010/01/Why-you-should-use-OpenGL-and-not-DirectX
+ http://www.joystiq.com/2009/05/22/dubious-marketing-microsoft-makes-directx-9-look-really-bad/

Artikel contra OpenGL
http://www.tomshardware.com/reviews/opengl-directx,2019-10.html

Gegenüberstellung einiger Features für OpenGL und DirectX
http://rastergrid.com/blog/2011/10/opengl-vs-directx-the-war-is-far-from-over/

Sonstiges

Maxwell GPUs mit ARM Rechenkerne (2011 kaufte Nvidia ARM Lizenzen, siehe auch Nvidia Tegra):
http://www.heise.de/newsticker/meldung/Nvidia-bestaetigt-Auf-Maxwell-GPUs-sitzen-auch-ARM-Prozessorkerne-1172923.html

http://www.streamcomputing.eu/blog/2012-04-18/usb-stick-sized-arm-computers/
http://www.itproportal.com/2011/06/20/intel-pushes-hpc-space-knights-corner/
http://www.pcwelt.de/ratgeber/Die-wichtigsten-ARM-Prozessoren-4159343.html

[...]

Mittwoch, 11. April 2012

Linux/Kubuntu - Qt + Cuda + QtCreator

"Cuda Toolkit 4.1 and Qt4 on Linux"

It is time for another tutorial. Today we want to setup Qt+Cuda on Linux/Kubuntu. It is recommend to install Qt from the repositories. In the 3rd section I also wrote down the instructions for compiling Qt from scratch. If you find some oddities, just leave a comment (this isn't the best HowTo, I am still learning).


Content:
1. GPU Drivers + CUDA Toolkit 4.1 + CUDA SDK
2. QtCreator and Qt4 Example Project with CUDA
3. Compile Qt4 from scratch (optional)
4. Tools - Debugging and Profiling

--

My System:
- Kubuntu 11.10 (Oneiric Ocelot) at 32bit.
- g++ v4.5, gcc v4.5 (4.6 and up is not supported by cuda toolkit 4.1, see here)
- Qt 4.7.4 (dev-tools, qtcreator)

Downloads:
- Cuda Toolkit 4.1 + SDK (got Ubuntu 11.04 & 32bit)
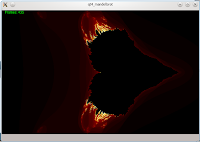
- qt4_mandelbrot (Qt4 example project with Cuda kernel)

--

1. Get the NVidia / CUDA stuff installed:

I've got here:
cudatoolkit_4.1.28_linux_32_ubuntu11.04.run
gpucomputingsdk_4.1.28_linux.run

1.1 Drivers
First of all we update our nvidia drivers. After I got some troubles with the downloaded drivers (blue colored videos^^) the following did it for me.

sudo add-apt-repository ppa:ubuntu-x-swat/x-updates
sudo apt-get update
sudo apt-get install nvidia-current

I've uninstalled all the nvidia drivers before, but maybe you don't have to. I did a backup of my /etc/X11/xorg.conf and stopped the x-server (ctrl+alt+F1 and sudo stop kdm, then purging my old nvidia stuff, then run the commands from above and finally sudo start kdm to get back, I hope you wont need to do that).

Now I have NVidia driver version 295.40.

(Refs: wiki.ubuntuusers.de, hecticgeek)

1.2 Toolkit
Just run:
sudo ./cudatoolkit_4.1.28_linux_32_ubuntu11.04.run

Edit your .bashrc:
export PATH=/usr/local/cuda/bin:$PATH
export LD_LIBRARY_PATH=/usr/local/cuda/lib:$LD_LIBRARY_PATH


1.3 NVIDIA GPU COMPUTING SDK
To install the gpu computing sdk, just run as user:
./gpucomputingsdk_4.1.28_linux.run

The examples are not build yet, you actually have to run make in ~/NVIDIA_GPU_Computing_SDK, but in most cases errors will occur.

Error Messages:

"unsupported GNU version! gcc 4.6 and up are not supported!",
Install gcc-4.5 and g++-4.5 as a second compiler and softlink to it in /usr/local/cuda/bin
sudo ln -s /usr/bin/gcc-4.5 /usr/local/cuda/bin/gcc

rendercheck_gl.cpp:(.text+0x119b): undefined reference to 'gluErrorString'
cannot find -lcuda
Lib paths are messed up in common.mk and common_cudalib.mk (see here). Path to nvidia_current is missing. I have uploaded a patched version.

Download Patch

Maybe you have to edit the path to your nvidia driver where libcuda and others are located. Edit in that downloaded patch the files common.mk and common_cudalib.mk at the beginning:
# ### patch for finding libcuda
NVIDIA_CURRENT = /usr/lib/nvidia-current/

There are still some errors in the freeImageInteropNPP in CUDALibraries, but I dont care for the moment. The examples can be compiled in NVIDIA_GPU_Computing_SDK/C/ directly. I run deviceQuery to check if installation was successfull.
~/NVIDIA_GPU_Computing_SDK/C/bin/linux/release$ ./deviceQuery

If this is working for you, then everything with cuda is fine. If you got "./deviceQuery: error while loading shared libraries: libcudart.so.4: cannot open shared object file: No such file or directory", then you forgot to add the cuda libs to LD_LIBRARY_PATH.


--

2. Qt4 Projects with CUDA on Linux

Start your QtCreator and create a new project (or download qt4_mandelbrot as example). My structure is:
qt4_mandelbrot - source code
qt4_mandelbrot/obj - object code including cuda object code
qt4_mandelbrot/bin - binaries

// I've disabled the shadow build option in the qt4 project settings, because I configured the directories in the .pro file on my own.

For the .pro file cuda settings I refer to this site. You also can have a look at the qt4_mandelbrot project.

In QtCreator you need to set the build environment. Go to Projects and add to the Build Environment a new variable "LD_LIBRARY_PATH" with "/usr/local/cuda/lib". Check if the execution environment has this setting as well.
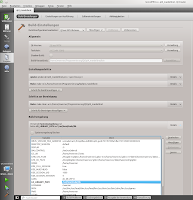

Press Ctrl+B or Ctrl+R to build/run the project.

--

3. Qt4 - compile it from scratch (optional)


Downloads:
- Qt Environment (Download Page)
- - Qt Sourcecode (tar.gz) (v4.8.1)
- - Qt Creator (32bit Binary, v2.4.1)

untar source code:
tar -xf qt-everywhere-opensource-src-4.8.1.tar.gz

configure Qt for compilation ("-release", "-shared" are actually default)
./configure -release -shared -no-qt3support -no-webkit -optimized-qmake -no-multimedia -no-phonon -nomake examples -nomake demos

compile and install (takes a while, runs with two jobs at once cuz I have two CPUs):
sudo make install -j2

install qt creator
chmod +x qt-creator-linux-x86-opensource-2.4.1.bin
./qt-creator-linux-x86-opensource-2.4.1.bin


start qt creator and set path to qmake (Qt Creator - Tools - Options: Qt Versions):
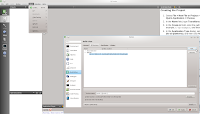

Now you can try a qt application created by the project wizard of Qt Creator. Press Ctrl+R to compile and run.

To get access to Qt on shell/console, you have to extend the PATH variable. Edit .profile and .bashrc (home directory) and add:
export PATH=/usr/local/Trolltech/Qt-4.8.1/bin/:$PATH

Uninstall:
Qt: cd /pathto/qt_source and sudo make uninstall
QtCreator: cd /pathto/qtcreator/ and run ./uninstall

--

4. Tools - Debugging and Profiling
For debugging you can try DDD (sudo apt-get install ddd):
ddd --debugger cuda-gdb ./application

If you just have a single GPU you can't debug local kernels yet. Since NSight 2.2 enables Single-GPU debugging again (NSight is only for Windows/VisualStudio), I hope the upcoming Toolkit 4.2 will do this for Linux as well.

For informations on memory leaks and access errors just use cuda-memcheck (see manual ;) ).

Profiling:
To profile the gpu site you can use the nvidia profiler (nvvp). Just run nvvp and open your binary into a new session.

You can profile (the host site) with gprof or oprofile. gprof needs the compiler flag -pg that is also available in nvcc. Just have a look at the .pro file coming with this tutorials example project. To get a profile you have to run the binary, which creates a gmon.out for the gprof profiler. Now you can generate a readable output:
gprof ./qt4_mandelbrot > output.txt

oprofile (sudo apt-get install oprofile oprofile-gui).
"OProfile is a system-wide profiler for Linux systems, capable of profiling all running code at low overhead. [...] OProfile leverages the hardware performance counters of the CPU [...]" (oprofile website)

So oprofile offers CPU and hardware based profiling which gprof doesn't. For usage I just refer to this site. If you want to read more about the sampling methods and the advantages of oprofile, so read this site.


References:
http://stackoverflow.com/...cuda-incompatible-with-my-gcc-version
http://developer.nvidia.com/cuda-toolkit-41
http://wiki.ubuntuusers.de/Grafikkarten/Nvidia
http://www.hecticgeek.com/...drivers-in-ubuntu-11-10-oneiric-ocelot/
http://forums.developer.nvidia.com/...compiling-sdk-on-ubuntu-11-10/p1
http://qt.nokia.com/downloads
http://cudaspace.wordpress.com/...qt-creator-cuda-linux
http://www.gnu.org/s/ddd/
http://oprofile.sourceforge.net/about/
http://doc.opensuse.org/...tuning.oprofile.html
http://lbrandy.com/...oprofile-profiling-in-linux-for-fun-and-profit/

Sonntag, 16. Oktober 2011

Mandelbrot - Qt and CUDA with OpenGL Visual Studio 2010


Do you like Mandelbrot Set? Do you like Animations? Wanna have all together right now? Here it comes. (It has been supposed to be an exciting announcement, nevermind...)

A small demonstration example for CUDA with OpenGL Pixelbuffer put together in a Qt4 Application.


Source Project Solution VS 2010 "qt4_mandelbrot"
16.04.12: This example is "deprecated". I have reworked and bugfixed it for the Linux tutorial, see here. I will release the VS2010 edition soon, but you can copy the new source from the Linux tutorial.
19.10.11: Bugfix: cudaGLSetGLDevice(0) must be called only in initGL()

(Requirements see previous tutorial on qt and cuda in vs2010)


In my previous tutorial on Qt, CUDA, VS2010 I have shown you how to integrate all the libs together. You have been able to run an empty CUDA kernel in a Qt Application. It already has an OpenGL Widget (yet black empty screen). Now you want to create a 2D Image with Pixel-Fun-Stuff processed right on the GPU. OpenGL is just used as Presenter.

Before I have started I had following questions:
  1. How to connect .cu source with .cpp source ?
    (i.e. running kernel functions by extern classes)
  2. How to calculate and paint the result on gpu side ?
    (without involving cpu cycles/host such as memcopy)
1. Our cuda source is compiled by nvcc as you know. On the other hand we have classes in C++ such as our OpenGL Widget or our custom class SimplePBO which is our "Pixelbuffer-CUDA-Manager". Since SimplePBO accesses the kernel function in kernelPBO.cu, we have to declare the accessing function. This is done in globals.h.
extern "C" void launch_kernel(uchar4*, unsigned int, unsigned int, int);
(You cannot include your .cu files, since they are not simply C files. The implementation on cuda side will be linked after compilation, so launch_kernel() will find its definition here.)

2. I assume you know how to create and bind textures in OpenGL. You may heard of pixel buffer objects too. It's well explained on this site. We will allocate our image space on gpu side creating a pixelbuffer object. CUDA will use this object for pixel manipulation (of course on gpu side as well). Our image then will be bound to an OpenGL Quad as texture. I want to give you an encouraging quote from one of my references ([1]):
As we will see, CUDA and OpenGL interoperability is very fast!
The reason (aside from the speed of CUDA) is that CUDA maps OpenGL buffer(s) into the CUDA memory space with a call to cudaGLMapBufferObject(). On a single GPU system, no data movement is required! Once provided with a pointer, CUDA programmers are then free to exploit their knowledge of CUDA to write fast and efficient kernels that operate on the mapped OpenGL buffers. ([1])
But there is a little restriction you should know: The Pixelbuffer Access is exclusive. Only one can access the pixel buffer at the same time, either CUDA or OpenGL.

I also recommend presentation [3] about CUDA and OpenGL, especially the part starting on page 22 (Steps To Draw An Image From Cuda). You will see how to work with the pixel buffer in OpenGL and Cuda.

In our Demonstration Project we use Qt (QGLBuffer) for dealing with the Pixelbuffer, so we dont have to care for OpenGL extensions (maybe glew for proc adresses and so on). We create the pixel buffer object as follows (simplePBO.cpp::createPBO()):

pixelBuffer = new QGLBuffer(QGLBuffer::PixelUnpackBuffer);
pixelBuffer->setUsagePattern(QGLBuffer::DynamicCopy);
pixelBuffer->create();

pixelBuffer->bind();
pixelBuffer->allocate(size_tex_data);

HANDLE_ERROR( cudaGLRegisterBufferObject( pixelBuffer->bufferId() ) );

In simplePBO.cpp::initCuda() the first cuda device is choosen ( cudaGLSetGLDevice(0) ). You will have to change on your own, if it doesnt fit. You can check your cuda devices with this little exe I wrote from [2]: CUDA Device Checker (output on console). A more advanced GUI based CUDA Checker you can obtain here named as CUDA-Z.

Ok, I do not want to explain every method here, just catch the code and explore the comments and consider the references [1; 3].

Last thing I want to mention is the image size. Due to the thread dimensions (16 per block) image size has to be a multiple of 16. So dont get confused about it. You also could set a fixed image size of 512 or 528 or something like that (see simplePBO.cpp::initCuda()).


References:
[1] - CUDA, Supercomputing for the Masses, from http://drdobbs.com/cpp/222600097
[2] - CUDA By Example, An Introduction To General-Purpose GPU Programming. Book source codes you can download here
[3] - What Every CUDA Programmer Should Know About OpenGL, PDF Version

Freitag, 14. Oktober 2011

Visual Studio 2010 with Qt and CUDA and OpenGL

How to integrate CUDA in Visual Studio 2010 and how to write your Qt App with OpenGL using CUDA.

Source download
(tested on Win7 VS2010, Geforce 9800GT).
(for project/solution you still have to follow the howto :P)

Assuming you have at least:
  • Windows 7 32bit/64bit (XP?)
  • Visual Studio 2010 (not Express Edition)
  • Qt 4.7.4 (howto integrate in vs2010)
  • CUDA capable gpu (see nvidia)
  • CUDA Toolkit 4.0 (32bit or 64bit)
    - Developer Drivers
    - CUDA Toolkit
    - GPU Computing SDK
    - Parallel Nsight 2.0 (makes integration in vs2010)
Howto:

Setup cuda syntax highlighting:
  • copy usertype.dat to visual studio as following (Win7):
    C:\ProgramData\NVIDIA Corporation\NVIDIA GPU Computing SDK 4.0\C\doc\syntax_highlighting\visual_studio_8\usertype.dat
    TO
    C:\Program Files (x86)\Microsoft Visual Studio 10.0\Common7\IDE
  • in your .cu files just add following headers for command recognition
    #include <cuda.h>
    #include <cuda_runtime.h>
    #include <device_launch_parameters.h>
Create Qt Project and connect .cu files with cuda.
  1. create a qt4 gui project (Qt4 Projects - Qt Application) in vs2010 (i will call it qt4_test2)
  2. follow the wizard and add OpenGL Library in the second step
    - (if you have 64bit consider the libgles32.lib linking bug, see notes in howto integrate in vs2010)
  3. right click on project in solution explorer and click "Build Customizations" ("Buildanpassungen")
    - select CUDA 4.0 ...
  4. go to Project Properties
    Add in Linker - Additional Dependencies
    - cudart.lib (cuda runtime library)
    Change Linker - System SubSystem to
    - Console (we want to see printf(), GUI will work though)
    In VC++ Directories
    - add $(CUDA_INC_PATH) to "Include Paths" (german "Includeverzeichnisse")
    Cutil Library
    If no cutil32.lib / cutil64.lib is there, just compile C:\ProgramData\NVIDIA Corporation\NVIDIA GPU Computing SDK 4.0\C\common\cutil_vs2010.sln
    Then add to your own project properties - VC++ Directories:
    - add $(NVSDKCOMPUTE_ROOT)\C\common\inc (Include Directories)
    - add $(NVSDKCOMPUTE_ROOT)\C\common\lib\Win32\ (Library Directories) (or x64\)
    or just copy *.dll from ..lib\Win32\ to ..lib\bin\
  5. add a new qt class (not gui class) to be our opengl widget
    - Classname = AppGLWidget
    - BaseClass = QGLWidget
    - Constructor = QWidget *parent
  6. open the qt4_test2.ui (this is our QMainWindow) (will start the qt designer)
    - make the central widget as AppGLWidget (see screenshots)

  7. add to source a new cuda c/c++ file (.cu)
    - kernel.cu
    - right click on kernel.cu for properties and choose "CUDA C/C++" Compiler as type.
    (if there isnt anything you may have forgotten step 3)
  8. insert the following code to the certain files:
AppGLWidget.h:
extern "C" void launch_kernel();

AppGLWidget.cpp in constructor method:
launch_kernel();

kernel.cu:

#include <stdio.h>
#include <cuda.h>
#include <cuda_runtime.h>
#include <device_launch_parameters.h>

__global__ void kernel()
{
 // ...
}

extern "C" void launch_kernel()
{
 printf("RUN CUDA KERNEL\n");
 kernel<<<1,1>>>();
}


Compile and go crazy.

Note: You will have to repeat project setting for Release configuration (assuming we've just been in Debug configuration).

Note: If you get asked at compiling that build must be finished ... you cant really get rid off it. it's an annoying bug of qt visual add-in. it's on the bug list (critical?). if you know more, just tell me.


For a more decent example in OpenGL using Pixelbuffer Objects for 2D procedural textures, see my next post: Qt4 Mandelbrot with CUDA.

Sonntag, 2. Januar 2011

QTfeedback first release

After some work i finally got it compiled on Windows.
You can get and test it:
http://sourceforge.net/projects/qtfeedback/files/qtfeedback_v1.0.zip/download

View some Screenshots on:
https://sourceforge.net/projects/qtfeedback/

It is more like beta version and not tested on other systems though.
You need libnoise (dll included) and OpenGL 2.0 or newer. Otherwise your texture will stay white.

Features so far:
  • Coloring sources with your own gradients (alphachannel supported)
  • Three different Feedback Methods (*)
  • Heightfield as one Feedback Plane (using libnoise)
  • Make Screenshots of your Feedback Fractals
  • some more features such as texture distortion ...

* Actually there is not much difference between the feedback modes. Mode 1 uses rendered scene to refeedback it like on a second layer. Cant explain it. Try and see, if you switch feedback option on source object.

The second mode is not easier to explain. First render pass uses a more little and mirrored heightfield. Second Pass is normal which uses feedback texture from first stage.

Uh i will have to find a logo for the executable...

Dienstag, 19. Oktober 2010

QTfeedback SVN Repository

I have setup a svn repository for version control of my so called QTfeedback code. That repo is public of course. License is GPL v2.1. Further Infos and Screenshots will be released on time. At the moment the interface is in german, but you will easily get through for sure :)

svn co https://qtfeedback.svn.sourceforge.net/svnroot/qtfeedback qtfeedback

If you want to compile, make sure you have OpenGL 2.1 driver and libnoise (http://libnoise.sourceforge.net/) installed.

10/10/22:
Updated to version SVN 6, color gradients from user images.


10/10/19:
By the way. After uploading the feedback video, i found more works on feedback code. One I want to mention is dave bollinger. His idea was the same but he used more rectangles. I follow him, so QTfeedback offers now multiple feedback planes. How nice...

Sonntag, 17. Oktober 2010

Feedback in Processing 1.0

Proof of concept version in processing 1.0 to reproduce feedback effect.
It takes the screen image as texture for the feedback plane.

PROCESSING SOURCE CODE: feedback_2.zip
Demo video on youtube: Feedback demo


I am also coding on a more clean optimized version in Qt and OpenGL. I will upload first source code during next week (depends on time I will have ;) ).


Keys:
o switch between objects (either feedback plane or input plane)
s render grid lines of object
+ increase object size
- decrease object size

r enables/disables relief on feedback plane
3 decrease grid res of feedback plane
4 increase grid res of feedback plane

p enables/disables input plane
a enables/disables input plane rotation

t Texture Mode on/off

Randomness of texture coordinates on feedback plane
g switch random mode (1=random,2=noise,3=deterministic function)
1 decrease influence (default influence=0)
2 increase influence

0 make screenshot